Manage Sub-Users on Your Account
Manage user access and permissions for your business accounts in Business Digital Banking using the Sub-User Administration tool. This guide will show you how to:
- View user profiles, access levels, and permissions.
- Add or clone new sub-users.
- Assign commercial services and limits.
- Modify, disable, or delete sub-user access.
- Approve pending changes (dual control only).
On this page, you can review a sub-user’s profile details, account limits, permissions for Commercial Services, and linked account access. Action buttons are also available to update each of the settings as needed.
To view a sub-user's information, use the following steps:
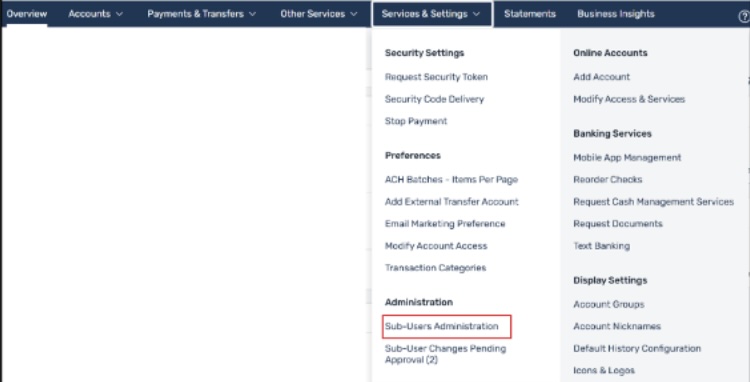
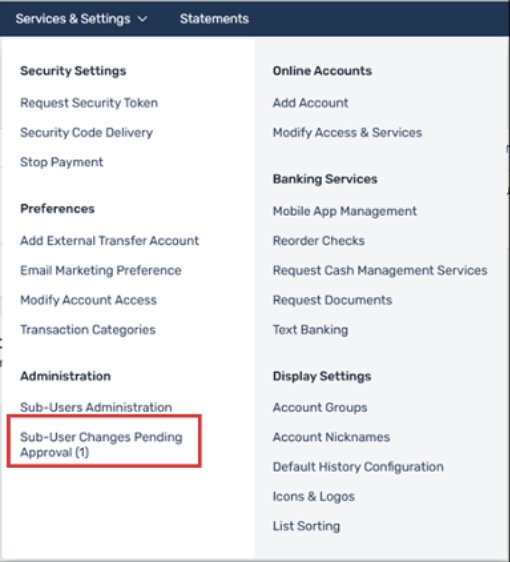
- Navigate to Services and Settings > Administration > Sub-User Administration.
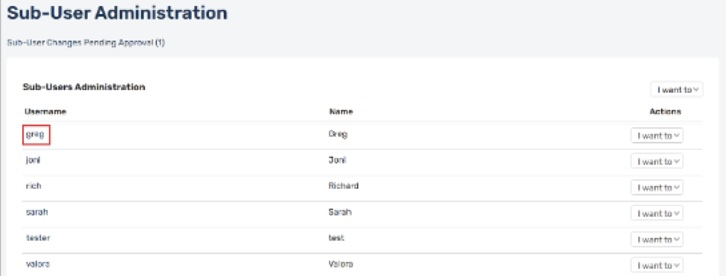
- When the Sub-User Administration page opens, select the sub-user’s Username link to view their information.
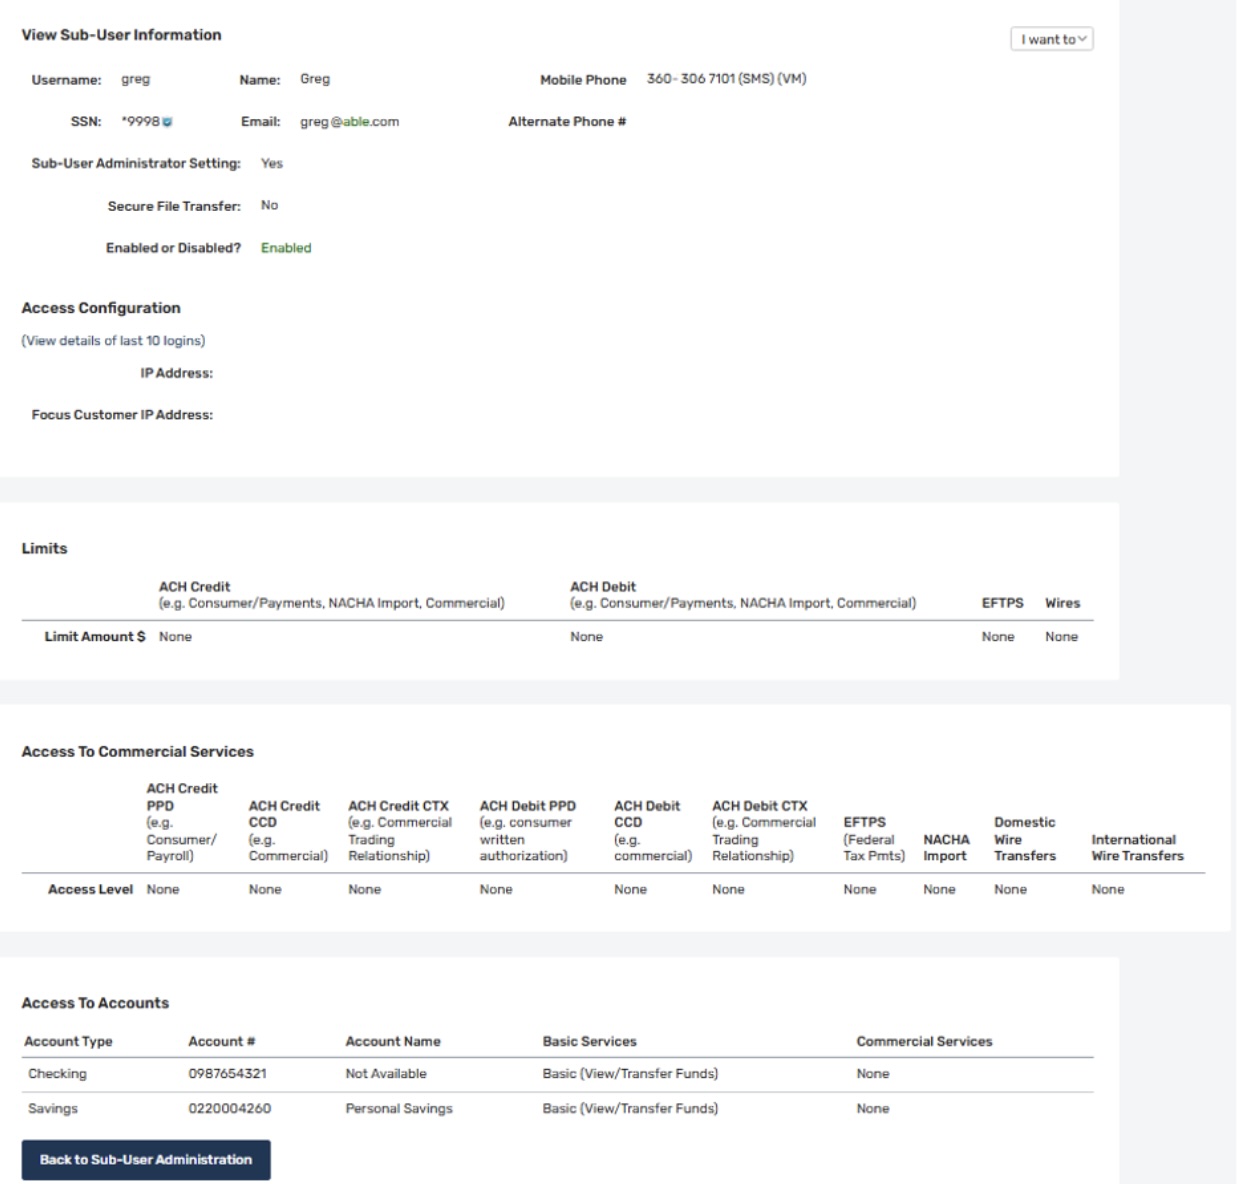
- When the View Sub-User Information page opens, the following sub-user information is displayed:
- Username - The unique username assigned to the sub-user.
- Name - The sub-user's full name.
- SSN - The sub-user's social security number. (Note: You may use a placeholder SSN (e.g. 999-99-9999) if needed.)
- Email - The sub-user's email address.
- Mobile Phone - The sub-user's mobile phone number (if provided).
- Alternate Phone - The sub-user's alternate phone number (if provided).
- Sub-User Administrator Setting - Displays Yes if the sub-user has full Administrator privileges.
- Secure File Transfer - Displays Yes if the sub-user has permission to use secure file transfer.
- Enabled or Disabled - Indicates whether the sub-user is Enabled or Disabled for Business Digital Banking access.
- Use View Details of Last 10 Logins to open a pop-up displaying the sub-users most recent IP addresses used to access Business Digital Banking.
- IP Address – Lists any IP address restrictions applied to this sub-user, alongside the business-level defaults.
Sub-users can be added directly from the Sub-User Administration page. When a Sub-User Administrator creates a sub-user, the sub-user automatically inherits several of the profile attributes from the business, including the address, city, state, postal code, fax number, and phone number. However, certain fields, such as Username, Name, Social Security Number, and Email address, must be defined during sub-user creation. Additionally, the Sub-User Administrator can assign mobile and alternate phone numbers to the sub-user. The Administrator may also grant Administrator privileges to the sub-user as needed.
The Sub-User Administrator determines which basic account services are available to the sub-user. These services are limited to those already available to the business. Additionally, the administrator can assign Commercial Services and access levels that are equal to or lower than those set at the business level.
- You can clone both sub-users and Sub-User Administrators. A cloned sub-user will inherit all business profile attributes, including accounts, Commercial Services privileges, access levels, and limits from the original sub-user. Administrator privileges can be granted to a cloned sub-user.
To create a new sub-user, follow these steps:
- Navigate to Sub-User Administration.
Go to Services and Settings > Administration > Sub-User Administration. - Initiate New Sub-User Creation.
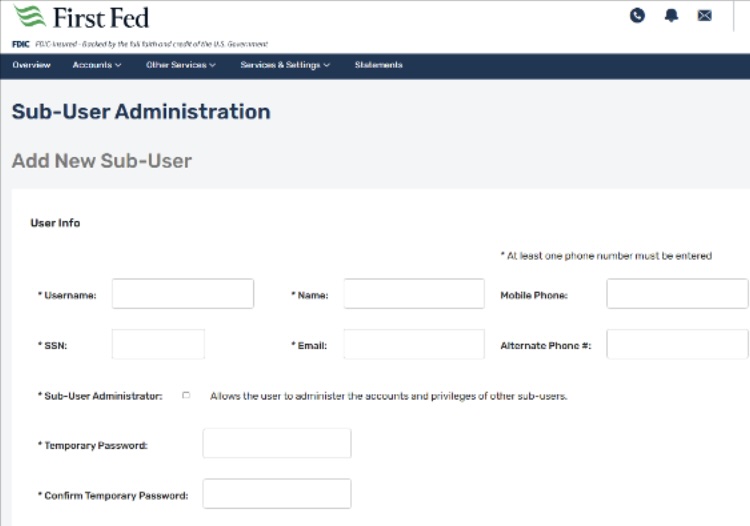
On the Sub-User Administration page, select the “I want to” menu, then select Add a New Sub-User. - Enter Sub-User Information.
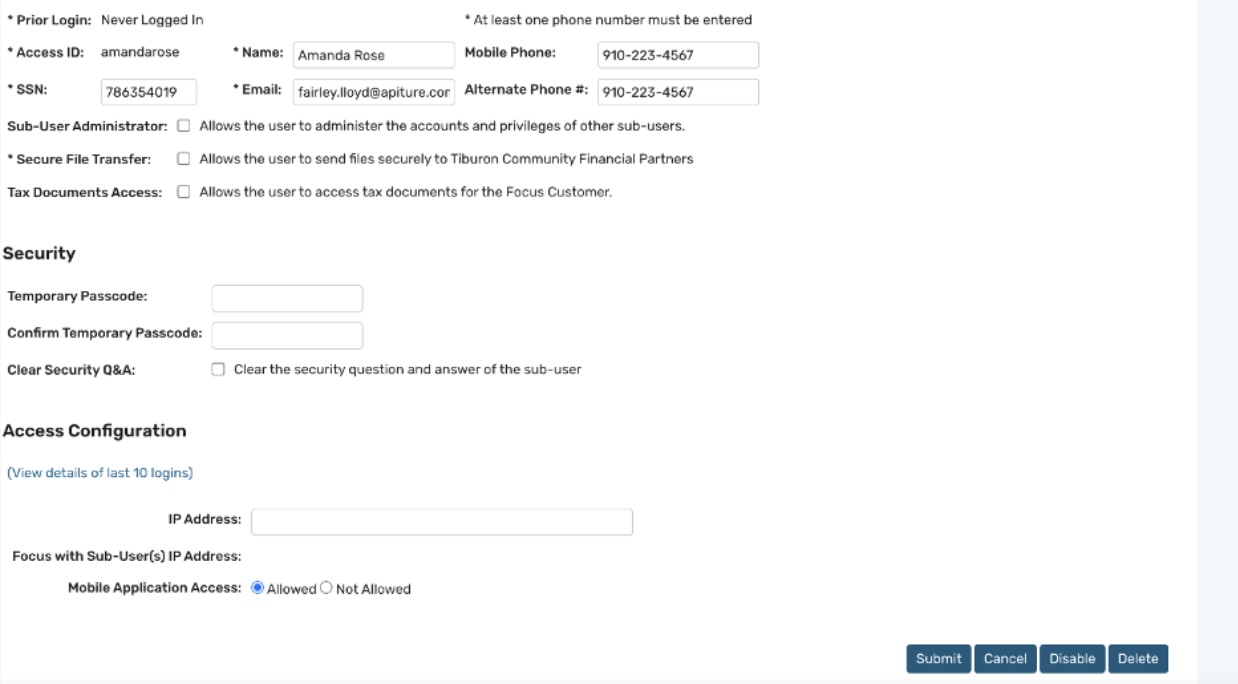
On the Add New Sub-User page, complete the following required fields: - Username: Enter a unique Username for the sub-user. The Username should contain at least five alphanumeric characters (a-z, A-Z, 0-9) and is case-sensitive. For example, “Apple” and “apple” are different usernames.
- Tip: Use descriptive usernames based on the sub-user’s role (e.g., if your business name is Main Street Plumbing, Inc., use “mainplumbingpayroll” for a payroll clerk.) This simplifies updates if personnel changes occur, while maintaining appropriate access and privileges.
- Name: Enter the sub-user’s full name.
- SSN: Enter the sub-user’s Social Security Number. (Note: You may use a placeholder SSN (e.g., 999-99-9999) if applicable.)
- Email: Enter the sub-user’s email address.
- Mobile Phone/Alternate Phone: Enter the sub-user’s mobile or alternate phone number. At least one phone number is required.
- Assign Administrative Privileges (Optional)
If you wish to grant Sub-User Administrator privileges, select the box labeled Allows the user to administer the accounts and privileges of other sub-users. - Assign Secure File Transfer Privileges
To assign secure file transfer privileges to the sub-user, select the box next to Allows the user to send secure files to First Fed Bank. - Set the Temporary Password
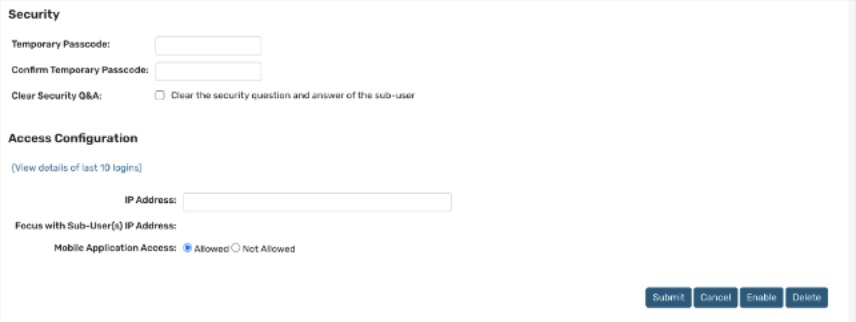
In the Temporary Password field, enter a temporary password and re-enter it in the Confirm Temporary Password field.
Note: Passwords are case-sensitive. The icon will indicate if Caps Lock is on. Temporary Passwords expire within two (2) days. The sub-user must log in and change the password within this time period or the account will be locked. - Configure IP Address Restrictions (Optional)
In the IP Address field, specify any allowed IP address or range of addresses that the sub-user can use to access Business Digital Banking. If this field is left blank, the business-level IP address restrictions (if any) will apply.
Note: To review the most recent login IP addresses for the sub-user, select the View details of last 10 logins link.

Add Access to Accounts
- Assign Basic Services
Select the basic service(s) that the sub-user should have access to from available accounts.
Note: The sub-user is limited to the services that the business has configured for each account. - Navigate Through Account List (if applicable)
If your business has more than 20 accounts, click the Next 20 button to view additional accounts. The system will automatically save your selections before moving to the next page. - Review and Submit
After reviewing the sub-user’s information and account access, click Submit to save the information.
Assign Commercial Services and Limits
- Access to Commercial Services
If applicable, select the Commercial Services that the sub-user should have access to. These services will be limited to what is available for the business. - Set Limits (if applicable)
Enter any applicable limit values (e.g. ACH Credit Limit, ACH Debit Limit) for the sub-user. - Final Review and Save
Once all fields are complete, click Finish and Save to finalize the sub-user creation. You will be redirected to the Sub-User Administration page, where the new sub-user will appear.
If you would like to assign an existing sub-user’s permissions to a new sub-user, you can do so quickly by cloning the existing sub-user. Follow the steps below to complete this process.
- Navigate to Sub-User Administration
Go to Services and Settings > Administration > Sub-User Administration. - Locate the Sub-User to be Cloned
Navigate to the sub-user you wish to clone and select Clone sub-user on the “I want to…” menu. - Enter User Information
Complete the required fields for the new sub-user’s basic profile information. - Validate and Clone
Select Clone to validate the input and initiate the cloning process. - Upon successful validation, a confirmation banner will appear, indicating the cloned sub-user has been created.
- The banner will include next steps to complete the cloning process, including reviewing and assigning account-level and Commercial Services privileges.
- If there are any issues, an error message will be displayed.
- Configure Basic Services
Proceed through each configuration step to finalize the sub-user set-up. - By default, all Basic Services associated with the original sub-user will be pre-selected for the cloned sub-user.
- The Sub-User Administrator may adjust these settings for each account as needed.
- Note: The Administrator can only assign services that the business has access to. For example, if the business has View Only access to an account, only View Only (or None) may be selected for that account.
- Navigate Through Account List (if applicable)
If your business has more than 20 accounts, click the Next 20 button to view additional accounts. The system will automatically save your selections before moving to the next page. - Save and Continue
Review all selections, then select Save and Continue. - If your business has additional Commercial Services, clicking Save and Continue will all the Administrator to adjust those settings the cloned sub-user.
- Even if no changes are needed, you must proceed through the remaining steps to finalize the cloned sub-user creation.
- If your business does not use Commercial Services, the button will instead read Finish and Save.
- Selecting Finish and Save will complete the process and redirect you the Sub-User Administration page, where the new cloned sub-user will be displayed.

Adding Commercial Services for a new sub-user is a streamlined, three-step process. Once the new sub-user’s profile information has been entered into the system, the system will guide you through a series of configuration pages where you can enable specific Commercial Services.
The available services include:
- ACH Credit & EFTPS
- ACH Debit
- NACHA Import
- Wire Transfers, Incoming Wire Transfers, and Check Reconciliation
These configuration pages will display only the accounts, services, and limit amounts that have been assigned to your business. As a Sub-User Administrator, you may assign access to any of these services based on your business’s entitlements.
To assign Commercial Services to a sub-user, follow the steps below.
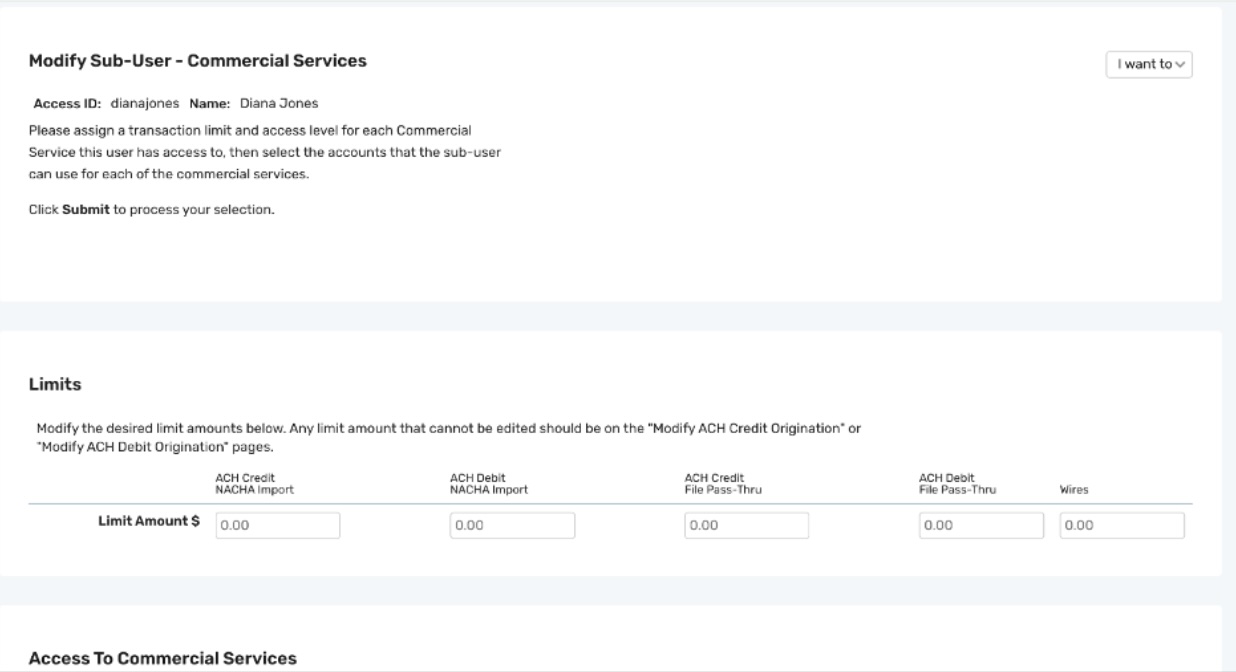
- Set Service Limits
In the Limits table, enter the maximum transaction amount allowed for each Commercial Service (e.g., ACH Credit Batches). Note: Limit amounts must not exceed your business’s assigned limit. If a higher amount is entered, an error will appear on the page. For NACHA Imports, both ACH Credit and ACH Debit limits are validated. - Configure Access to Commercial Services
In the "Access to Commercial Services" table, select the appropriate access level for each service from the dropdown list. - If your business is entitled to Same Day ACH, enable the Same Day ACH Credit or Same Day ACH Debit option for the sub-user, as applicable.
- For NACHA Import Services additional configuration options will appear:
- Transaction Type – Choose Credits, Debits, or Both.
- Allowed SEC Codes – Select permitted Standard Entry Class codes. These depend on your business’s service class privileges.
- Balanced Batches / File Pass-Thru – Enable to allow importing of balanced batches (total credits and debits are equal.)
- Same Day NACHA Import Credit/Debit – Enable to same-day processing of imported NACHA batches.
- For ACH Pass-Thru Services additional configuration options will appear::
- Transaction Type – Choose Credits, Debits, or Both.
- Allowed SEC Codes –Select the transaction types allowed for this sub-user.
- Balanced Batches / File Pass-Thru – Enable to allow uploads of balanced files.
- Unbalanced File Pass-Thru – Enable to allow uploads of unbalanced pass-thru files.
- Assign Accounts
For each service, select the account(s) the sub-user should have access to. - Access Level Guidelines
For ACH Credit, ACH Debit, Wire Transfers, and related services: - If the Payment Role is set to Editor, Limited Editor, or Viewer, at least one account must be selected.
- To give approval privileges, the sub-user must also have one of the above roles selected.
- If the role is Viewer, the sub-user cannot have Full Approvals, as they cannot initiate transactions.
- Sub-users with Editor or Limited Editor roles must also have access to templates (Template Editor or Template Viewer). They cannot be assigned No Access to templates.
Note: If Approve Only, View, or None is selected as the access level and any accounts are selected, the system will display an error. These roles do not require account-level assignments. - Submit Changes
Select Submit to save your changes.
Overview of the Sub-User Changes Pending Approval Page
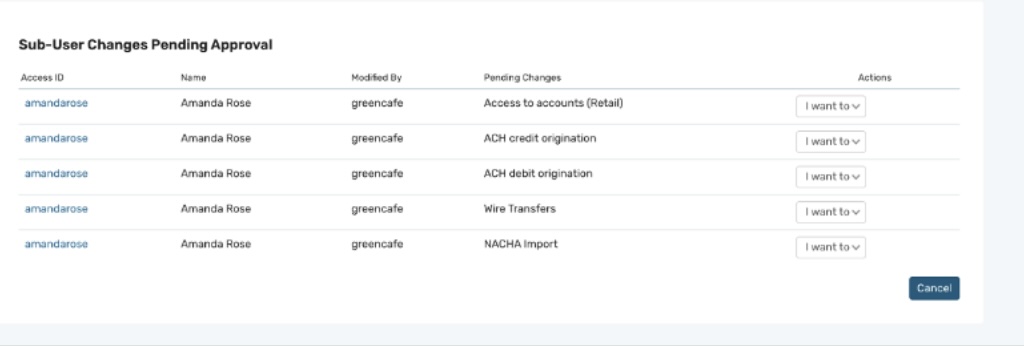
This page lists all sub-users with pending changes, grouped by usernames and change type. If multiple changes are pending for the same sub-user, they may be categorized into separate rows based on the type of change.
| Username | The sub-user’s username. Click this link to view the sub-user’s profile and current settings on the View Sub-User Information page. |
| Name | The full name of the sub-user with pending changes. |
| Modified By | The username of the Sub-User Administrator who initiated the changes. |
| Pending Changes | The type of change(s) awaiting approval (e.g. “NACHA Import”). A single type may include multiple modified fields or settings. |
| Actions | A drop-down menu with the following options:
|
Note: Approvers cannot approve changes they initiated. The Approve action will not be available in those cases.
How to Approve or Reject Pending Sub-User Changes
- Navigate to: Services & Settings > Administration > Sub-User Changes Pending Approval.
- View Pending Changes
Locate the sub-user whose changes you wish to review. From the I want to… menu in the Actions column, select View Details. - Review Current and Proposed Values
The View Sub-User Information page displays both current and proposed values for the pending change type. Click Approve or Reject from the I want to… menu. - Confirm Your Decision
A confirmation page appears summarizing the pending changes. Click Submit to finalize the approval or rejection. Tip: If you’re familiar with the pending changes and do not need to review the details, you may approve or reject them directly from the Actions column on the Sub-User Changes Pending Approval page.
As a Sub-User Administrator, you can make changes to a sub-user’s profile, reset passwords, and manage account status.
Steps to Modify a Sub-User
- Navigate to the Sub-User Administration page.
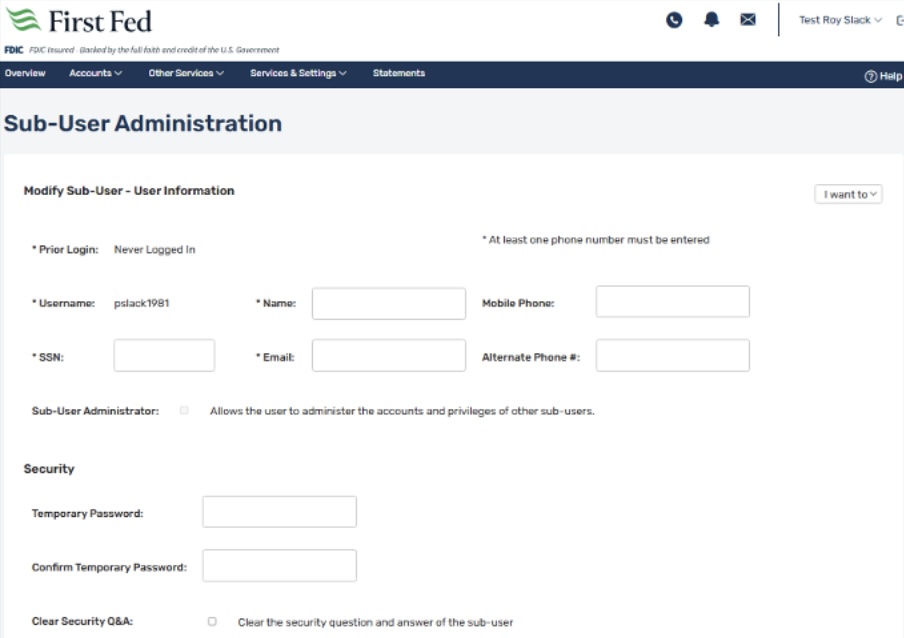
- In the I want to… menu next to the desired Username, select Modify Sub-User Information.
- On the Modify Sub-User – User Information page, make the necessary edits.
- Save your changes.
Key Points:
Information That Can be Modified
You may update the following sub-user details:
- Basic User Information – You can modify the sub-user’s name, Social Security number, mobile and alternate phone numbers, and email address. Note: The following fields cannot be edited, as they are inherited from the main business profile: address, city, state, postal code, date of birth, main phone number, and fax number. The Username also cannot be changed.
- Password Reset – You may assign a temporary password the sub-user. This password will expire in two (2) days. When the sub-user logs in with the temporary password, they will be prompted to create a new password. Note: After the new password is set, the system automatically sends a Password Change Notification to the sub-user’s external email address.
Available Actions
In addition to modifying sub-user information, the following actions can be performed from the Modify Sub-User Information page:
Disable / Enable Sub-User:
- You can disable a sub-user to restrict their access to the system.
- Scheduled transactions created by the sub-user will still be processed.
- A “Disabled” icon will appear next to their username on the Sub-User Administration page.
- To reactivate the sub-user, click the Enable button.
Delete Sub-User
- Deleting a sub-user will permanently remove their access.
- Any future-dated transactions they initiated (e.g., scheduled transfers, ACH batches, or wire transfers) will be canceled and not processed.
- Pending transactions will be automatically unscheduled.
Approval Reminder: If your business uses dual control, changes will not take effect until they are approved by another Sub-User Administrator. If your business does not use dual control, all newly created sub-users will be approved by First Fed Bank. All related fields will appear grayed out and cannot be edited.
The Sub-User Administration module allows you to modify a sub-user's access to accounts. In this case, the Sub-User Administrator can only remove or lower the basic privileges for an account that were given to the Focus Customer.
To Modify a Sub-User’s Account Access:
- Navigate to the Sub-User Administration page.
- In the I want to… menu next to the relevant username, select Modify Access to Accounts.
- On the Modify Sub-User – Access to Accounts page, make the necessary changes.
- Save your updates.
Key Points
Sub-User Administrators can adjust a sub-user’s access to business accounts. However, you can only reduce or remove access levels – you cannot grant more privileges than those already assigned to the business.
- If you reduce a sub-user’s account access from Full Access to View Only, any scheduled transactions that have not yet started will be automatically unscheduled.
- Notifications will be sent in real-time to both the Focus Customer and the sub-user, informing them of any affected transactions.
Approval Reminder: If your business uses dual control, changes will not take effect until they are approved by another Sub-User Administrator. If your business does not use dual control, all sub-user changes will be approved by First Fed Bank. All related fields will appear grayed out and cannot be edited.
Sub-user Administrator’s can adjust Commercial Services access, but only to reduce or remove privileges originally granted to the sub-user for a given account.
To Modify a Sub-User’s Commercial Services:
- On the Sub-User Administration page, open the I want to… menu for the appropriate sub-user and select the Modify Commercial Services action (the exact options depend on your business’s service entitlements).
- The Modify Sub-User – Commercial Services page will appear. Update the settings as needed.
- Select Submit to save your changes.
- You will be taken to the View Sub-User Information page to review the modifications.
Note: Limits are enforced at the time of both approval and processing of ACH payments.
Key Points:
- If a sub-user’s role is changed for ACH Credit from Editor to Viewer, any pending transactions initiated by that sub-user will be unscheduled.
- Notifications are sent immediately to both the Focus Customer and the sub-user for transparency.
- The system will automatically prevent approval of any transaction that exceeds the sub-user’s assigned limit. If an attempt is made, the payment will fail, be unscheduled, and trigger an alert to the Focus Customer and the sub-user.
Approval Reminder: If your business uses dual control, changes will not take effect until they are approved by another Sub-User Administrator. If your business does not use dual control, all sub-user changes will be approved by First Fed Bank. All related fields will appear grayed out and cannot be edited.
Sub-User Administrators have the ability to disable a sub-user account at any time. Disabling a sub-user deactivates their username, preventing them from logging in to Business Digital Banking until it is re-enabled. Note: Any scheduled transactions previously initiated by the disabled sub-user will still be processed as scheduled.
You may also choose to reassign a disabled username by updating the sub-user’s name, Social Security number, and Security Questions & Answers. Note: If First Fed disables and later re-enables the business, all sub-users must be manually re-enabled by a Sub-User Administrator.
To Disable a Sub-User:
- Navigate to the Sub-User Administration page.
- In the I want to… menu next to the relevant username, select Modify Sub-User Information.
- On the Modify Sub-User – User Information page, select Disable.
- A confirmation page will appear.
Note: You may re-enable the sub-user at any time by clicking Enable. Alternatively, you may choose to reassign the username to a different individual by updating their user details.
As a Sub-User Administrator, you can permanently delete a sub-user from the system. Once deleted, the sub-user’s username becomes inactive and cannot be used to login.
Important: Any scheduled transactions initiated or approved by the deleted sub-user will be unscheduled and will not be processed.
To Delete a Sub-User:
- Navigate to the Sub-User Administration page.
- In the I want to… menu next to the sub-user’s name, select Modify Sub-User Information.
- On the Modify Sub-User – User Information page, select Delete.
- The Delete Sub-User confirmation page will appear, listing any scheduled transactions initiated or approved by the sub-user. These transactions will be cancelled automatically.
- Click Submit to confirm and complete the deletion.
- A Deletion Confirmation page will appear to confirm the sub-user has been successfully removed.